Design Primers with Claude Code or another AI assistant
Paste this prompt into Claude Code or another AI coding assistant to design primers for your sequence:
Help me design PCR assembly primers for my RNA construct using the Primerize Python package (https://github.com/ribokit/Primerize), and produce the IDT ordering block.

1. Install: pip install git+https://github.com/ribokit/Primerize.git
2. Run:
     import primerize
     sequence = "PASTE_YOUR_SEQUENCE_HERE"  # RNA or DNA, any case
     result = primerize.Primerize_1D.design(sequence, prefix="my_rna")
     if result.is_success:
         print(result)
         result.save()  # writes my_rna.txt

3. Open my_rna.txt — scroll to the bottom for the IDT block (between START/END markers),
   formatted for direct paste into IDT Bulk Input:
   https://www.idtdna.com/site/order/oligoentry
   Use "Lab Ready" for Normalization when ordering.

My sequence is: PASTE_YOUR_SEQUENCE_HERE
The overall RNA synthesis pipeline is as below:
Template Design
- Add flanking sequences and test for folding.
- Design primer assembly.
Make DNA
- PCR.
- Product purification.
- Check for size on gel.
Make RNA
- IVT.
- Product purification.
- Check for size on gel.
We recommend testing single PCR assembly first before ordering M2 plates.

Final DNA
To prepare RNA by in vitro transcription, a DNA template corresponding to the RNA sequence of interest is required. In addition to the actual RNA sequence of interest, the DNA sequence requires 5´ and 3´ extensions, some of which will be transcribed into the RNA. These extensions are as follows:
T7 Promoter
A T7 promoter sequence on the 5´ end of the DNA, which provides a region for the T7 RNA polymerase to bind to initiate transcription. This region is NOT transcribed, and will not be a part of the resulting RNA. The T7 promoter sequence (20 bases) to be added to the DNA template is as follows:
TTCTA ATACG ACTCA CTATA
Tail
A 3´ tail extension, required for primer extension experiments. For structure mapping experiments, the modified RNA is reverse transcribed into DNA, which is then read by a sequencer. Reverse transcription requires the presence of a primer (18 – 20 bases), complimentary to the 3´ end of the RNA, which is then extended all the way to the 5´ end of the RNA, or to other stops within the RNA sequence, depending upon the modification being used. This means that modifications in the last ~20 bases in the RNA, cannot be read out using primer extension. To help read out the entire sequence of interest, and to save time on fluorescent labeling of primers, we add a 3´ tail extension with a shared primer binding site. This 3´ tail should be added to the DNA template sequence, and this will be transcribed into RNA.
The 3´ tail does not have any particular sequence requirement, but an A-rich tail is preferable. Note that the 3´ tail should not interfere with the structure of the RNA being probed. An example of a 3´ tail is as follows:
AAAGA AACAA CAACA ACAAC
This a sequence that we repeatedly re-use as a primer binding site, which we call ‘Tail2’. It is critical (see below) to check in silico that this tail has negligible likelihood of base pairing with your sequence of interest.
5´ & 3´ Buffer
The last band observed in RNA modification experiments followed by capillary (or gel) electrophoresis, corresponding to the 5´ end of the RNA, is often dark and reduces the readout of the first 5 bases in the RNA. This buffer region, of ~10 – 15 bases ensures that the whole RNA sequence of interest can be read out adequately in an electrophoresis experiment. This 5´ buffer region also needs to be added to the DNA template, and will also be transcribed into RNA.
As with the 3´ tail, no specific sequence is required, except that it should not interfere with the structure of the actual RNA, by forming alternative secondary structures. It is preferable to have the first ~2 - 3 bases be G for best results . When no reference hairpin is used, an example of a 5´ leader is as follows:
5´ Buffer: GGAAA AAUAA 3´ Buffer: AAAAC AAAAC
We recommend the use of reference hairpins, as described in:
Kladwang W., et al. (2014) Standardization of RNA Chemical Mapping Experiments. Biochemistry 53(19): 3063-3065
An example of 5´ & 3´ Buffer region with reference hairpins is as follows:
5´ Buffer: GGAGA CCUCG AGUAG AGGUC AAAA 3´ Buffer: AAACA ACUCG AGUAG AGUUG ACAAC
Sequence of Interest
It is important that you do a quick consistency check -- you want to avoid having the added 5´ and 3´ flanking sequences base pair with the region of interest (ROI). You can run the complete sequences into programs like Vienna RNAfold or EternaFold as quick checks that the predicted structures of the RNAs remain the same with and without the flanking sequences.
Modify your flanking sequence design until it no longer interferes with proper folding of ROI. Never change your ROI sequence! You may also wish to design a second set of flanking sequences; measurements on the extra set will serve as a control for perturbations from the flanking regions. Finally, you can create the RNA without flanking sequences, and separately label primers internal to the RNA.
Step 1 — Generate your IDT ordering block using the Primerize Python package:
import primerize

sequence = "TTCTAATACGACTCACTATA..."  # your full sequence (T7 promoter + gene + tail)
result = primerize.Primerize_1D.design(sequence, prefix='MyRNA')
if result.is_success:
    result.save()  # writes MyRNA.txt
Open MyRNA.txt and scroll to the bottom. You will find an IDT block between START and END markers — tab-separated rows of Name, Sequence, 25nm, STD — ready to paste directly into IDT's Bulk Input. Use Lab Ready for Normalization when ordering.
Bulk Format Ordering at IDT DNA Oligos
First, go to “Custom DNA Oligos”
Custom Synthesis
- Custom DNA Oligos
- Custom RNA Oligos
- Ultramer Oligos (up to 200 bases)
- 96 and 384 Well Plates
- GMP for Molecular Diagnostics
Click the “Bulk Input” button.
Then paste the IDT section in the text box, and adjust the choices properly.
Bulk Input
| Code | Scale |
|---|---|
| 25nm | 25 nmole |
| 100nm | 100 nmole |
| 250nm | 250 nmole |
| 1um | 1 μmole |
| 5um | 5 μmole |
| 10um | 10 μmole |
| ... | ... |
| Code | Purification | ||||
|---|---|---|---|---|---|
| STD | Standard Desalting | ||||
| PAGE | PAGE $50.00 | ||||
| HPLC | HPLC $45.00 | ||||
| IEHPLC | IE HPLC $45.00 | ||||
| ... | ... | ||||
Plate Format Ordering at IDT DNA Oligos
First, go to “96 and 384 Well Plates”
Custom Synthesis
- Custom DNA Oligos
- Custom RNA Oligos
- Ultramer Oligos (up to 200 bases)
- 96 and 384 Well Plates
- GMP for Molecular Diagnostics
Choose the “25 nmole DNA Plate Oligo” option.
| Product | Pricing | Length | |
|---|---|---|---|
| 25 nmole DNA Plate Oligo | $0.19 USD / Base | 15 - 60 Bases | Order |
| 100 nmole DNA Plate Oligo | $0.29 USD / Base | 10 - 90 Bases | Order |
| 250 nmole DNA Plate Oligo | $0.49 USD / Base | 5 - 100 Bases | Order |
| 1 umole DNA Plate Oligo | $1.00 USD / Base | 5 - 100 Bases | Order |
Use the following options:
| Field | Option |
|---|---|
| Choose Entry Method | File Upload |
| Documentation | |
| Email Address | [Your Email] |
| Select Plate Well Type | 96 Well Plate |
| Choose Loading Scheme | Explicitly Entered |
| Field | Option |
|---|---|
| Select Synthesis Scale | 25 nmole DNA oligo |
| Select Purification | Standard Desalting |
| CE Service | No |
| Choose Oligo Amount per Well | Normalized in NMoles |
| Select Plate Type | V-Bottom |
| Select Shipping Options | Wet (frozen on dry ice) |
| Field | Option |
|---|---|
| Amount | 10 nmole ** |
| Concentration | 100 uM |
| Final Volume | 100 uL ** |
| Ship Remainder? | No |
| Select Dilutant | IDTE Buffer pH 8.0 |
NOTE: Options that different from default are highlighted. ** Available normalized yield by vendor may vary from time to time.
- After reviewing your selections, you're now ready to enter your sequences.
- Upload your Excel files and then select Process Plates. Plates will need to have more than 24 oligos to make a sufficient order.
- After processing, click on the image of each plate to confirm the options you selected above. Sometimes they will have changed for an unknown reason.
- Add the plates to your cart and check the options again.
- Proceed with checkout.
PCR Recipe (Single-Round)
| Concentration | Components | Volume (μl) |
|---|---|---|
| 5x | HF Buffer | 10.0 |
| 10 mM (1) | dNTPs (A,T,C,G) | 1.0 |
| 100x | Phusion Polymerase | 1.0 |
| 1 μM (2) | Primer 2 R, 3 F, 4 R, 5 F | 2.0 (each) |
| 100 μM (2) | Primer 1 F, 6 R | 2.0 (each) |
| ddH2O | 26.0 | |
| Total | 50.0 |
(1) Use stock of 10 mM dNTPs, which has 10 mM of each dATP, dTTP, dCTP, dGTP mixed together.
(2) For terminal primers (1 F, 6 R), use 100 μM. For internal primers (2 R, 3 F, 4 R, 5 F), dilute to 1 μM. Add 2.0 μl of each primer to mixture.
PCR Conditions
| Steps | Time | Temperature |
|---|---|---|
| Initial Denaturation | 30 s | 98 °C |
| Denaturation | 10 s | 98 °C |
| Annealing | 30 s | 60 °C (3, 4) |
| Extension | 30 s | 72 °C |
| Repeat 30 cycles | ||
| Final Extension | 10 min | 72 °C |
(3)
Choose annealing temperature wisely. We recommend to use the same as min_Tm by Primerize design, which is usually between 60-64 °C.
(4) Check PCR product on 4% agarose gel. If assembly is unsuccessful with shorter mis-priming products, we suggest try raising the annealing temperature to reduce mis-priming. Alternatively, splitting the assembly into separate sub-pools (i.e. primer 1-4 and primer 5-6) and do an additional round of full assembly (see below).
PCR Recipe (Multiple-Round)
When the aforementioned fast '1-pot' recipe does not yield pure assembled DNA fragments (usually due to mispriming), there are alternative strategies that split the full assembly into 'sub-pools' or pots, and assemble in a second round using the pre-assembled pieces as building blocks. When Primerize gives warnings about misprimings, we carry out both the one-shot protocol above and the following multiple-round strategies as well, evaluating attainment of full-length DNA template by agarose gel.
Strategy 1: '2-Round'
The '2-Round' strategy attempts to assemble sub-pools of 'half' of the full sequence, and extend the 'half' pieces together in a second round PCR. This might be helpful when there are mispriming sites across the sequence, and partitioning them into separate pools avoid such issues.
Please make sure that the sub-pools overlap, and each sub-pool consists of even number of primers. Otherwise the PCR will not work as desired.
Sub-Pool 1
| Concentration | Components | Volume (μl) |
|---|---|---|
| 5x | HF Buffer | 10.0 |
| 10 mM | dNTPs (A,T,C,G) | 1.0 |
| 100x | Phusion Polymerase | 1.0 |
| 1 μM | Primer 2 R, 3 F | 2.0 (each) |
| 100 μM | Primer 1 F, 4 R | 2.0 (each) |
| ddH2O | 30.0 | |
| Total | 50.0 |
Sub-Pool 2
| Concentration | Components | Volume (μl) |
|---|---|---|
| 5x | HF Buffer | 10.0 |
| 10 mM | dNTPs (A,T,C,G) | 1.0 |
| 100x | Phusion Polymerase | 1.0 |
| 1 μM | Primer 4 R, 5 F | 2.0 (each) |
| 100 μM | Primer 3 F, 6 R | 2.0 (each) |
| ddH2O | 30.0 | |
| Total | 50.0 |
Final Pool
| Concentration | Components | Volume (μl) |
|---|---|---|
| 5x | HF Buffer | 10.0 |
| 10 mM | dNTPs (A,T,C,G) | 1.0 |
| 100x | Phusion Polymerase | 1.0 |
| Product from sub-pools 1, 2 | 7.0 (each) | |
| 100 μM | Primer 1 F, 6 R | 2.0 (each) |
| ddH2O | 20.0 | |
| Total | 50.0 |
Strategy 2: 'Couple'
The 'Couple' strategy is one step further of the '2-Round' approach, that further divides the assembly into sub-pools of primer pairs. It is rare when neighboring primers have mispriming sites other than the designed region. Thus, breaking the assembly down to 'couples' is likely to work.
Please make sure that the sub-pools overlap. Otherwise the PCR will not work as desired.
| Concentration | Components | Volume (μl) |
|---|---|---|
| 5x | HF Buffer | 10.0 |
| 10 mM | dNTPs (A,T,C,G) | 1.0 |
| 100x | Phusion Polymerase | 1.0 |
| 100 μM |
Sub-Pool 1
| Primer 1 F, 2 R | 2.0 (each) |
Sub-Pool 2
| Primer 3 F, 4 R | 2.0 (each) |
Sub-Pool 3
| Primer 5 F, 6 R | 2.0 (each) |
| Concentration | Components | Volume (μl) |
|---|---|---|
| ddH2O | 34.0 | |
| Total | 50.0 |
Final Pool
| Concentration | Components | Volume (μl) |
|---|---|---|
| 5x | HF Buffer | 10.0 |
| 10 mM | dNTPs (A,T,C,G) | 1.0 |
| 100x | Phusion Polymerase | 1.0 |
| Product from sub-pools 1, 2, 3 | 7.0 (each) | |
| 100 μM | Primer 1 F, 6 R | 2.0 (each) |
| ddH2O | 13.0 | |
| Total | 50.0 |
PCR Product Purification
We recommend use of magenetic beads to purify the PCR Product. Other purification methods, e.g. spin columns and ethanol precipitation, should also suffice.
For full details, please follow the instructions by Agencourt AMPure XP .
| Step | Procedure |
| 1 | Mix 40 μl of PCR reaction with 72 μl (1.8x) Ampure beads by pipetting up-down 10 times. |
| 2 | Leave at room temperature (RT) for 10 min on orbital shaker for binding. |
| 3 | Separate bead by placing on a 24-post magnetic stand for 7-10 min. |
| 4 | Discard supernatant, rinse beads with 200 μl 70% ethanol, leave RT for 30 sec, discard liquid. |
| 5 | Rinse with 200 μl 70% ethanol again, leave RT for 30 sec, discard liquid. |
| 6 | RT dry 15-20 min on 24-post magnetic stand, till the beads are completely dry and appear 'cracked'. |
| 7 | Add 35 μl ddH2O, mix the beads, leave RT for 5 min on orbital shaker. |
| 8 | Separate bead by placing on a 24-post magnetic stand for 3-5 min. |
| 9 | Keep supernatant and check the concentration of DNA with Nanodrop spectrophotometer. |
We recommend use of agarose gels to visualize the size of DNA template for confirmation of the success of PCR assembly. For DNA gels, we prepare 4 % agarose gel in 1x TBE with Ethidium Bromide (EtBr). Please follow the procedures below:
| Step | Procedure |
| 1 | Prepare 150 ml 1x TBE by mixing 15 ml 10x TBE with 135 ml ddH2O, then add 7.5 μl 10 mg/ml EtBr (5), mix well. |
| 2 | Weigh 3.0 g of agarose, add into 1-liter bottle. Then add 75 ml 1x TBE buffer (containing EtBr), heat by microwave for 1 min 45 sec (6), until it melts down. |
| 3 | Wait for 5 min for the gel solution to cool down to ~ 60 °C. Pour the gel into gel box and insert the comb. Allow gel to solidify at RT for 30 min. |
| 4 | Aliquot 2.5 μl of sample and add 2.5 μl of ddH2O, then add 2.0 μl 6x DNA Loading Buffer. |
| 5 | When the gel is fully solidified, remove the comb, and pour the rest of 1x TBE buffer into gel box. Make sure the gel is fully immersed. |
| 6 | Load samples into lanes, flanked by 7.0 μl DNA ladders (10 bp & 20 bp ). |
| 7 | Attach and turn on power supply, run electrophoresis at 15 W for 30 min. |
| 8 | Once the run is finished, turn off power supply. Visualize the gel on a UV transilluminator, e.g. gel documentation system. |
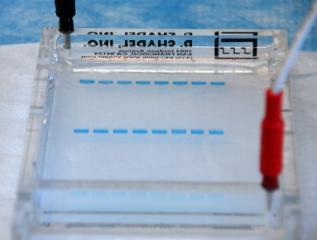
Gel box setup.
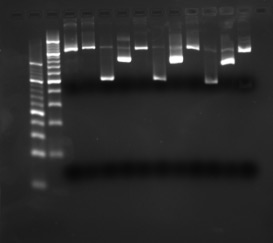
Example gel image: 4 % agarose in 1x TBE with EtBr, 15 W 20 min.
(5) EtBr bleaches when exposed to light. EtBr is also carcinogen and always use gloves when handling gel mix and buffer.
(6) Divide the microwave time into 1 min, 30 sec, and 15 sec. Gently shake the bottle between intervals.
IVT Recipe
| Concentration | Components | Volume (μl) |
|---|---|---|
| 10x | TX Buffer | 4.0 |
| 1 M | DTT | 1.6 |
| 10 mM (7) | NTPs (A,U,C,G) | 4.0 |
| 40 % | PEG-8000 | 4.0 |
| 1x | NEB T7 RNA Polymerase | 2.4 |
| Subtotal | 16.0 | |
| dsDNA Template (8 pmol) | x (8) | |
| ddH2O | 24.0 - x | |
| Total | 40.0 |
| Steps | Time | Temperature |
|---|---|---|
| Incubation | 4 h | 37 °C |
(7) Use stock of 10 mM NTPs, which has 10 mM of each ATP, UTP, CTP, GTP mixed together.
(8) Use 8 pmol of dsDNA template, the volume of which is calculated as:
DNA (μl) = 8.0 / DNA (μM)
Where DNA (μM) is calculated as previously described.
IVT Product Purification
The purification steps for IVT Product is the same as PCR Product, with one exception for short RNAs (9). Please see previous section for details.
(9) For RNA constructs that are shorter than 150 nt, we recommend adding 40 % PEG-8000 to the Ampure beads to a final concentration of 15-20 % to facilitate nucleic acid binding to the beads.
We recommend use of agarose gels to visualize the size of RNA transcript for confirmation of the success of PCR assembly. For RNA gels, we prepare 4 % agarose gel in 1x TAE with Syber Green II . Please follow the procedures below:
| Step | Procedure |
| 1 | Prepare 150 ml 1x TAE by mixing 3 ml 50x TAE with 147 ml ddH2O, then add 25 μl 10,000x Syber Green II (10), mix well. |
| 2 | Weigh 3.0 g of agarose, add into 1-liter bottle. Then add 75 ml 1x TAE buffer (containing Syber Green II), heat by microwave for 1 min 45 sec, until it melts down. |
| 3 | Wait for 5 min for the gel solution to cool down to ~ 60 °C, add 2.25 ml 37% formaldehyde (11) and mix. Pour the gel into gel box and insert the comb. Allow gel to solidify at RT for 30 min, covered with foil. |
| 4 | Aliquot 4.0 μl of sample and add 6.0 μl RNA Loading Buffer (contains formamide). |
| 5 | When the gel is fully solidified, remove the comb, and pour the rest of 1x TAE buffer into gel box. Make sure the gel is fully immersed. |
| 6 | Heat the samples to 90 °C for 5 min, cool down for 30 sec. Do the same for RNA ladders (low range ) (10). |
| 7 | Load samples into lanes, flanked by RNA ladders. |
| 8 | Attach and turn on power supply, run electrophoresis at 15 W for 30 min. |
| 9 | Once the run is finished, turn off power supply. Visualize the gel on a UV transilluminator, e.g. gel documentation system. |

Example gel image: 4 % agarose in 1x TAE and formaldehyde with Syber Green II, 15 W 30 min.
(10) Syber Green II bleaches when exposed to light, thus the buffer should be made fresh every time. Syber Green II and RNA ladder are stored at -20 °C.
(11) 37% formaldehyde is toxic through skin contact and inhalation of vapors. Manipulations involving formaldehyde should be done in a chemical fume hood.
Step 1 — Generate 96-well plate files for your M2 mutant library:
import primerize

sequence = "TTCTAATACGACTCACTATA..."  # your full sequence
# First design 1D primers
res1d = primerize.Primerize_1D.design(sequence, prefix='MyRNA')
# Then design the 2D mutant library plates
res2d = primerize.Primerize_2D.design(
    sequence,
    primer_set=res1d['primer_set'],
    which_lib=1,   # 1 = Watson-Crick swaps (A↔U, C↔G)
    prefix='MyRNA'
)
if res2d.is_success:
    res2d.save()
    # Writes: MyRNA_plate_N.xls  → upload to IDT 96-well plate ordering (Section #2)
    #         MyRNA_Lib1_plate_N_primer_P.svg  → plate layout diagrams (examples below)
This produces:
MyRNA_plate_N.xls— one file per 96-well plate, with columns WellPosition, Name, Sequence. Upload to IDT’s 96-well plate ordering page (see Section #2 Plate Format above).MyRNA_Lib1_plate_N_primer_P.svg— color-coded plate layout diagrams: green = wild-type well, purple = mutant construct, gray = empty well. Use these as a visual guide during PCR plate setup — examples shown below.MyRNA_keys.txt— ordered list of all construct names (WT + each mutant) for tracking samples through the assay.
We would like to share some tricks on making life easier for preparing M2 plates. Here is an example of a small M2 set, with a total of 60 constructs (including WT):

Primer 1 F

Primer 3 F

Primer 2 R

Primer 4 R
Final DNA
First, set up a 'helper' plate for WT primers. Aliquot each WT primer into a full column.

Helper Primers 1 F - 4 R
On a new PCR-plate, add Primers 1 F - 4 R one by one. Use the 'helper' plate to fill in wells that do not use a 'mutant' primer (present on the plate). WT primers are colored in green (see below).

Primer 1 F

Primer 2 R

Primer 3 F

Primer 4 R
(12) Do not forget that the plates of primer 2 R and 3 F should be diluted to 1 μM for final use.
(13) Make a 'master mix' of the rest of PCR recipe for the parallel synthesis. For starters, you may want to make some extra (e.g. 120x for 96x reactions) in case of shortage caused by pipetting.
(14) Use a new box of tips for each primer plate to better locate yourself of the progress. Use multi-channel pipettes.
(15) For a longer construct, there will be more primers for each assembly and possibly more than one plate of constructs to make. Take your time and keep good track of plate numbers.